

Falco, or Sysdig Falco, is a behavior activity monitoring tool for keeping track of what’s going on on your servers in real time. It works similarly to tools like OSSEC, but only detects and alerts, lacking the means to take any action, like block offensive traffic.

It’s a kernelspace tool which works by loading a kernel module onto the system and monitors all syscalls the system sees. In this way, Falco keeps track of any activity passing through the system.
When Falco is started, it reads settings from a configuration file named falco.yaml, and rules from a file named falco_rules.yaml, both under the etc directory. Falco’s rules determines what the application alerts on, and are very easy to write and customize
When a rule is triggered, Falco can log to the display, syslog, a file, and can send alerts via email to an address specified in its configuration file.
In this article, you’ll learn how to install Falco and use it to detect WordPress backdoors.
Prerequisites
To complete this tutorial, you’ll need to have the following in place:
- An installation of WordPress on any Linux server, but preferably on an Ubuntu 16.04 server, because testing of Falco was done on a server running Ubuntu 16.04.
- The server must have the ability to send emails. So at the very least, you need to have a send-only SMTP server installed.
Step 1 – Installing dependencies
- If not already installed, install the kernel headers
sudo apt-get -y install linux-headers-$(uname -r)
- You’ll need
gitin step 2, so install it using:
sudo apt install git
- The Request library has to be installed because the application you’ll install in step 2 and use in step 7 needs it to function. The easiest method of installing the Request library is by using
pipenv. Unless you havepipenvinstalled already, following these steps to install it: - First install these to get
pip. You’ll needpipto installpipenv:
sudo apt install python-setuptools python-pip
- Then use
pipto installpipenv:
sudo pip install pipenv
Finally, use pipenv to install the Request library:
sudo pipenv install requests
In the next step, we’ll install the application to use in injecting a backdoor into WordPress.
Step 2 – Installing a backdoor injection tool
To test whether Falco can detect backdoors, you need to be able to inject a backdoor into your installation of WordPress, unless you want to sit and hope and pray that some hacker will do you the favor. In this step, we’ll install a simple application on your desktop or laptop (not on the server running WordPress). That application is WPForce.
You can skip this step if you have another of such tool that you can use to inject a backdoor into WordPress. Otherwise read along.
To install WPForce on your laptop or desktop, you only need to clone it from its GitHub repository. So go right ahead and clone it to your desktop or laptop:
git clone https://github.com/n00py/WPForce
That’s just about it with WPForce in this step. You’ll learn how to use it to inject a backdoor in WordPress in step 7.
Step 3 – Installing Falco
An installation package for Falco is not in the official Ubuntu repository, so we’ll need to add the project’s repository to the system. That’s accomplished using the following set of commands.
First add the repository key:
curl -s https://s3.amazonaws.com/download.draios.com/DRAIOS-GPG-KEY.public | sudo apt-key add -
Then add the repository itself:
sudo curl -s -o /etc/apt/sources.list.d/draios.list https://s3.amazonaws.com/download.draios.com/stable/deb/draios.list
Update the package database so the package manager is aware of the new repository:
sudo apt update
Finally, install Falco:
sudo apt install falco
With that, Falco should now be installed. However, the systemd service is not started by default. You’ll learn how to do that in step 6. But first, let’s show you how to configure it in the next step.
Step 4 – Configuring Falco
Falco has a simple, YAML configuration named /etc/falco.yaml. There are a few changes we’ll need to make in that file to make Falco function the way we want – send security alerts to a specific file separate from the default, which is to syslog, then also send alerts to a specified email address.
So open the file using:
sudo nano /etc/falco.yaml
By default the setting that will send alerts to a file other than to syslog is disabled, so you’ll need to enable it and specify the file you wish to have security alerts sent to. That default default setting is shown below:
file_output:

enabled: false

filename: ./events.txt
Now you just need to enable it and specify the new file that security alerts should be sent to. Don’t worry if the file does not yet exist. Falco will create it automatically when it is (re)started.
file_output:

enabled: true

filename: /var/log/falco.log
Next scroll to the bottom of the file and look for these settings:
program_output:

enabled: false

program: mail -s "Falco Notification" [email protected]
And change it so they read (change the email to a valid address). Security alerts will be sent to the specified email address:
program_output:

enabled: true

program: mail -s "Falco Notification" [email protected]
Save and close the file.
Falco givs you an option to test the validity of the configuration file. You may now do so using the following command (no need to invoke admin privileges):
falco -c /etc/falco.yaml -L
If the file is misconfigured and, therefore, fails the test, you’ll get an output like this that makes it easy to find and fix the offending setting or settings:
Cannot read config file (/etc/falco.yaml): wrong type at key program_output

... Runtime error: yaml-cpp: error at line 54, column 12: bad conversion. Exiting.
If the test is successful, the first two lines of the output would be these, followed by a listing and description of the rules in the Falco rules file:
Tue Sep 19 09:27:47 2017: Falco initialized with configuration file /etc/falco.yaml

Tue Sep 19 09:27:47 2017: Parsed rules from file /etc/falco_rules.yaml
With the configuration out of the way, Falco is now ready to use with the default rules, but there are a few changes we need to make to make it work with our installation of WordPress the way we want. That will be the subject of the next step.
Step 5 – Modifying Falco rules to monitor WordPress files
The rules that dictate how and what Falco monitors and alerts on are defined in the /etc/falco_rules.yaml file. The top section of that file contains definitio of macros and lists that are used in the rules’ conditions.
Out of the box, Falco’s default rules will detect when an unauthorized application spawns a shell on a monitored system. In other words, it will detect a backdoor on a system it is installed on, including one on which you have WordPress installed. However, it will not detect when someone adds a malicious file under the WordPress installation directory or when a chunk of (malicous) code is injected into any WordPress file.
In this step we’ll define a macro that points to the WordPress installation directory, then create a rule that will keep track of file changes under that directory. To make that happen, open the Falco rules file for editing:
sudo nano /etc/falco_rules.yaml
The macro that points to the WordPress installation directory is defined below. If you installed WordPress some place other than /var/www/html, change the directory to match. Now copy and paste the code as-is into the top of the file.
- macro wp_dir

  condition: fd.name startswith /var/www/html
The rule that makes use of that macro is shown below. This rule is triggered when a new file is created, when an existing file is opened for editing, or when a file a copied under the WordPress installation directory. And it will trigger only if the user responsible for the offending operation is not the user under which the Web server is running. This is typically the www-data system user. If that’s different in your environment, change it to match. Then copy the chunk of code as-is and paste it into the top of the General Rules section of the rules file.
- rule: Write below WordPress dir

desc: an attempt to write to any file under the WordPress directory

condition: wp_dir and evt.dir = < and open_write and user.name != www-data

output: "File below WP dir opened for writing (user=%user.name command=%proc.cmdline file=%fd.name)"

priority: ERROR

tags: [filesystem]
Satisfied that no mistake has been made during any of the copy-and-paste operations? Then save and close the file.
Before you move on to the next step, Falco gives you a means to test the validity of the file. To make use if that means, use the following command (no need to invoke admin privileges):
falco -L
If it passed, the first two lines of the output would be these, followed by a listing and description of the rules defined in the file.
Tue Sep 19 20:03:20 2017: Falco initialized with configuration file /etc/falco.yaml

Tue Sep 19 20:03:20 2017: Parsed rules from file /etc/falco_rules.yaml
We may now move on to the next step and start Falco.
Step 6 – Starting Falco
If the test of the configuration file and the rules files in steps 4 and 5 were successful, Falco should start successfully when called to do so. So go ahead and start it with the following command:
sudo systemctl start falco
if started successfully, you’ll have output like these:
Starting LSB: Falco syscall activity monitoring agent...

...: Falco initialized with configuration file /etc/falco.yaml

...: Wed Sep 13 21:17:51 2017: Falco initialized with configuration file /etc/falco.yaml

...: Parsed rules from file /etc/falco_rules.yaml

...: Wed Sep 13 21:17:51 2017: Parsed rules from file /etc/falco_rules.yaml

...: Started LSB: Falco syscall activity monitoring agent.
Note that whenever its configuration or rules files are modified, Falco has to be restarted using the following command:
sudo systemctl restart falco
After starting it, you may verify that the log file you specified in the configuration file back in step 4 was created using the following command:
ls -lh /var/log | grep falco
The output should indicate that, yes, the log file was created and being written to:
-rw-r--r-- 1 root root 3.2K Sep 19 10:02 falco.log
Now we’re ready to test Falco to see if it can detect backdoors or other potentially malicious activity in your installation of WordPress.
Step 7 – Injecting a backdoor into WordPress to test Falco
A (software) backdoor is often a surreptitious method of gaining entry into and control of a computer system. And usually with evil intentions. Worse, they tend to be very difficult to detect and remove, very often requiring the services of expert computer security services to eliminate.
They tend to work by spawning a shell that connects back to their source or that enables the originator to take control of the compromised system.
In this step, you learn how to use WPForce, which you learned how to install in step 2, to inject a very simple, but no less malicious backdoor into your installation of WordPress. The WPForce script we’ll use is named yertle.py. To start using it, change into the WPForce directory:
cd WPForce
To upload the backdoor, type the following command. The u and p options point to the WordPress admin username and password. Yes, you need to know those for this to work:
python yertle.py -u falco -p falco-back -t http://your-server-ip-address -i
If succesful, the outpout should take this form:
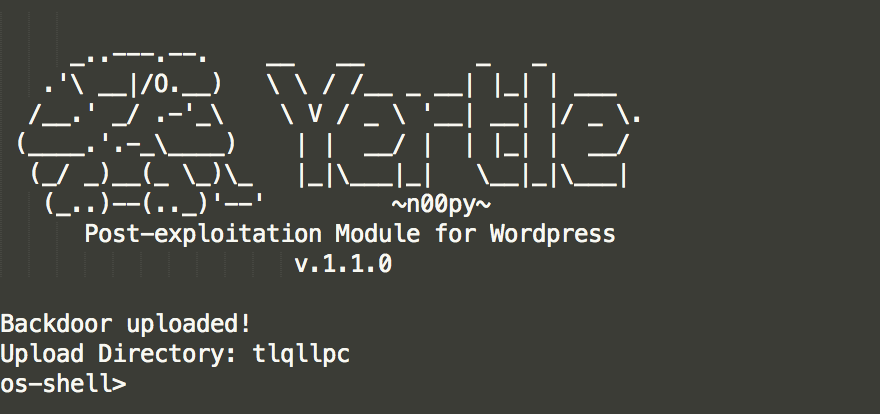
Now you suddenly have backdoor access to your WordPress installation. From your WordPress dashboard, you should notice a new plugin has been installed that matches the backdoor’s Upload Directory. If this were a truly malicious attempt, the attacker now has control of the server and may go wild like a kid in a candy store.
But that’s not the goal here. We want to find out if Falco can detect this intrusion. If you’re tail-ing the Falco security alert file (use this command: sudo tail -f /var/log/falco.log), you should see an output of this sort:
20:25:12.837317887: Debug Shell spawned by untrusted binary (user=www-data shell=sh parent=apache2 cmdline=sh -c /usr/sbin/sendmail -t -i pcmdline=apache2 -k start)
You’ll also receive an email with the same info as above. That certifies that Falco works, and that if any backdoor is uploaded to the system, you’ll know about it and take appropriate action.
What if someone manages to gain shell access to the server and starts messing with files under the WordPress installation directory? The response would be the same. The rule you created in step 5 will trigger if a new file is added, a file is copied, or a file is modified under the WordPress installation directory. And Falco will send the appropriate alert – to the alert file and to the configured email address. The alerts should take this form:
21:25:52.307216963: Error File below WP dir opened for writing (user=root command=nano functions.php file=/var/www/html/wp-content/themes/twentyseventeen/functions.php)
That doesn’t tell you what was written to the file, but if a WordPress file is reported as being modified by a user when you know it should not be, then the alarm bells should be going off. And if the unauthorized code injected into the file will confer backkdoor access, you can be certain that Falco will alert you.
To exit from the backdoor script, type:
exit
Conclusion
You’ve learned, in this tutorial, what Falco is, how to install it, how to inject a backdoor into a WordPress installation, and how to use Falco to detect that backdoor and other unauthorized activity under the WordPress installation directory. But that only scratches the surface of the kindof information that Falco can alert on your system.
If time permits, take time to read he macros, lists and rules in the Falco rules file. That will help you understand how Falco works and how to modify existing rules to fit you environment.
For more on Falco, take a look at the project’s page on GitHub.
Pingback: Backdooring WordPress with Phpsploit - WPSec