
Update: A new CRS 4 has been released. These instructions are for CRS 3 and no longer work. In CRS 4, exclusion lists have been replaced with plugins.
In this guide, you will learn how to install and protect WordPress using the Open Source Web Application Firewall (WAF) ModSecurity. We will also install the latest protection rules from the OWASP Core Rule Set (CRS). A WAF is a great addition to the Cyber Security protection for your WordPress blog or website and can stop many zero-day attacks and known attacks, or as the project describes itself:
The CRS aims to protect web applications from a wide range of attacks, including the OWASP Top Ten, with a minimum of false alerts.
This guide is written for the latest Ubuntu Linux LTS (Long Term Support), which is 20.04.3.
Installing ModSecurity and Core Rule Set
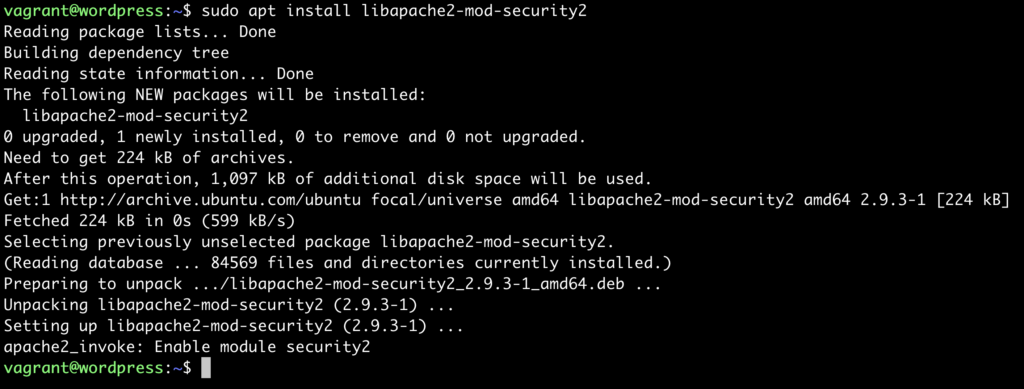
The first step is to install ModSecurity from the package repository:
sudo apt install libapache2-mod-security2
And it will look something like this if the above command is successfull:
sudo a2enmod security2
And also restart the Apache webserver:
sudo systemctl restart apache2
You can also verify that the module is loaded using this command: apache2ctl -M|grep security
Now, we must enable the blocking of Cyber Attacks in the ModSecurity module. This is not enabled by default so we need to change the SecRuleEngine config option:
sudo cp /etc/modsecurity/modsecurity.conf-recommended /etc/modsecurity/modsecurity.conf
And then edit the file /etc/modsecurity/modsecurity.conf using your favorite editor such as vim, emacs or nano. You need to change the line:
SecRuleEngine DetectionOnly
to
SecRuleEngine On
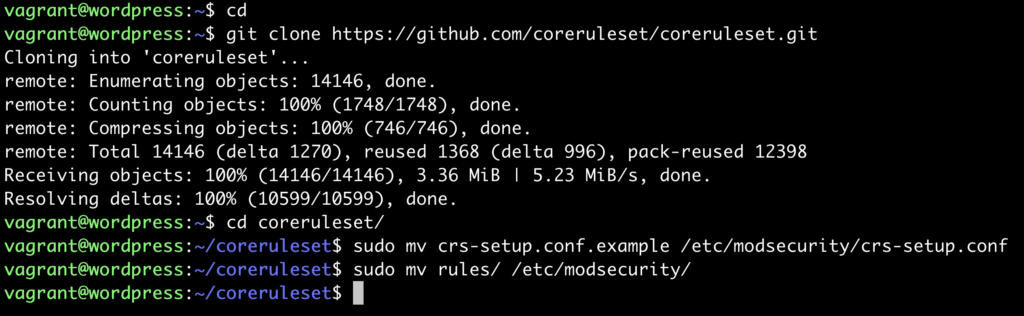
That’s it regarding Apache and ModSecurity. Now, we need to download and enable the latest Core Rule Set:
cd
git clone https://github.com/coreruleset/coreruleset.git
cd coreruleset
sudo mv crs-setup.conf.example /etc/modsecurity/crs-setup.conf
sudo mv rules/ /etc/modsecurity/
If it goes well, it would look something like this screenshot:
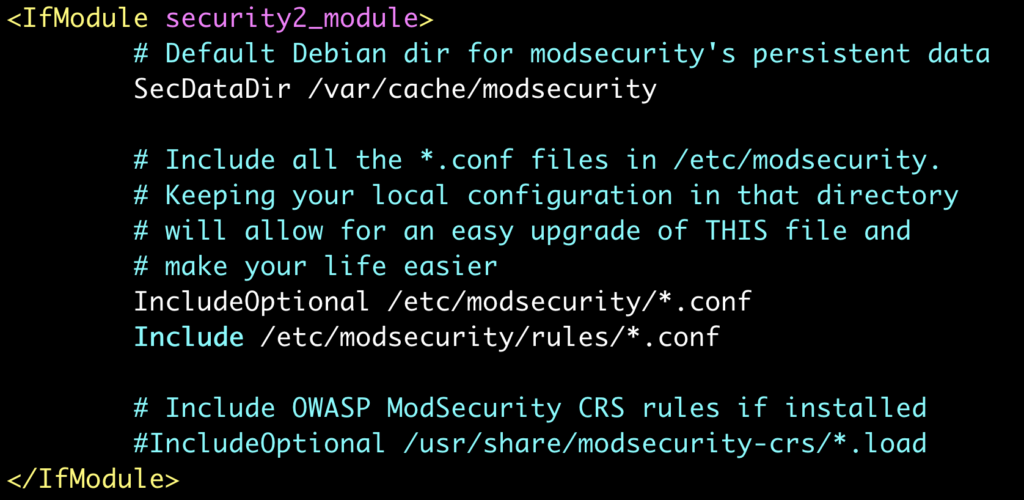
After this, we will allow the rules in the configuration file and remove the old CRS. So the next step is to edit the file /etc/apache2/mods-enabled/security2.conf so it will look like this:
And then, as the last step of enabling ModSecurity and the Core Rule Set, restart Apache:
sudo systemctl restart apache2
ModSecurity WordPress tweaks
To get WordPress to work better with ModSecurity and the OWASP Core Rule Set (CRS), we need to make a few small tweaks. CRS has a variable named tx.crs_exclusions_wordpress and can be enabled depending on the URL of your WordPress installation. Edit the file crs-setup.conf and change the following lines:
# SecRule RESecAction \
#SecAction \
# "id:900130,\
#  phase:1,\
#  nolog,\
#  pass,\
#  t:none,\
#  setvar:tx.crs_exclusions_cpanel=1,\
#  setvar:tx.crs_exclusions_dokuwiki=1,\
#  setvar:tx.crs_exclusions_drupal=1,\
#  setvar:tx.crs_exclusions_nextcloud=1,\
#  setvar:tx.crs_exclusions_phpbb=1,\
#  setvar:tx.crs_exclusions_phpmyadmin=1,\
#  setvar:tx.crs_exclusions_wordpress=1,\
#  setvar:tx.crs_exclusions_xenforo=1"
So it will look like this:
SecAction \
 "id:900130,\
  phase:1,\
  nolog,\
  pass,\
  t:none,\
  setvar:tx.crs_exclusions_wordpress=1
#  setvar:tx.crs_exclusions_cpanel=1,\
#  setvar:tx.crs_exclusions_dokuwiki=1,\
#  setvar:tx.crs_exclusions_drupal=1,\
#  setvar:tx.crs_exclusions_nextcloud=1,\
#  setvar:tx.crs_exclusions_phpbb=1,\
#  setvar:tx.crs_exclusions_phpmyadmin=1,\
#  setvar:tx.crs_exclusions_wordpress=1,\
#  setvar:tx.crs_exclusions_xenforo=1"
Remember to reload the new rules by issuing a reload to the Apache webserver:
sudo service apache2 reload
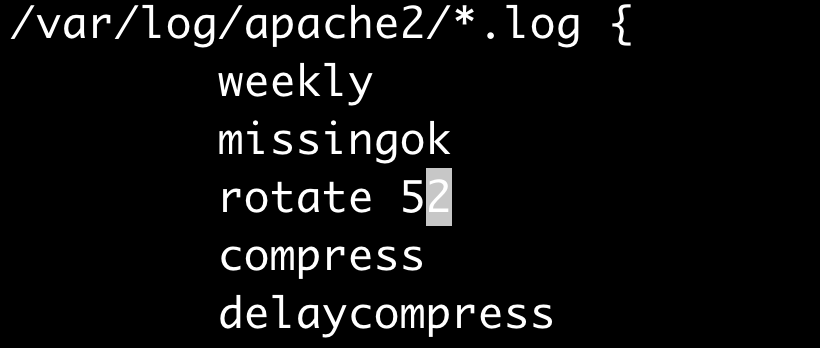
Important: Always remember to save more just than 14 days of logs. We recommend saving at least one year of logs, and this can be changed in the file: /etc/logrotate.d/apache2 in this case, we are saving weekly and 52 weeks (one year):
Problems and fixes
The first problem we will run into is the following error:
Execution error - PCRE limits exceeded (-8)
And this error can be fixed by raising the following configuration option: SecPcreMatchLimit and SecPcreMatchLimitRecursion in the /etc/modsecurity/modsecurity.conf file. Set them to:
SecPcreMatchLimit 1000000
SecPcreMatchLimitRecursion 1000000
And the next error that will show up is when a file is being uploaded:
Access denied with code 403 (phase 2). Match of "eq 0" against "MULTIPART_UNMATCHED_BOUNDARY" required
This can be fixed by commeting out line 86 in the modsecurity.conf file, like this:

Also, the following error is displayed in the log file when the Theme Editor in WordPress is used:
Request body no files data length is larger than the configured limit
Update the file modsecurity.conf and change SecRequestBodyLimit to the value 6000000.
Also, we need to whitelist a few IDs. Create the following file:
/etc/apache2/conf-enabled/whitelist.conf
Add the following lines:
<LocationMatch "/wp-admin/theme-editor.php">
  SecRuleRemoveById 300015 300016 300017 950907 950005 950006 960008 960011 960904 959006 980130
</LocationMatch>

<LocationMatch "/wp-admin/admin-ajax.php">
  SecRuleRemoveById 300015 300016 300017 950907 950005 950006 960008 960011 960904 959006 981173 980130
</LocationMatch>
Also, remember to always run reload when changing the ModSecurity configuration and rules:
sudo systemctl reload apache2
That’s it! If you find any other errors, please comment below so we can help each other make WordPress even more secure.
my question is where modsecurity should be installed, on the same server where wordpress is installed, or in a separate vps server ?
You may want to mention, now that CRS 4 has been released, that these are instructions for CRS 3 and no longer work. In CRS 4, exclusion lists have been replaced with plugins.